The world is full if amazing cake sculptors and designers and shows like Ace of Cakes and Food Network Challenge prove that there is little that cannot be made of cake.
For my Grandpa’s memorial services last month I decided that a cake shaped like a baseball cap would be a fitting tribute to the person that never went anywhere without one. Here’s the steps I took to make the hat cake – enjoy!
How to Make a Hat Cake
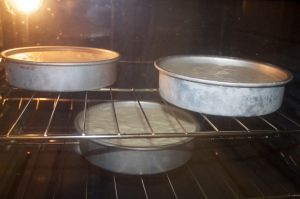
1. Bake your cake. You’ve got a couple of options with this one. I chose to bake the cake in 3 layers and then carve it into the shape of a hat. However, if you’re not comfortable with the idea of carving you can definitely bake one layer in the base of a metal mixing bowl and use that rounded piece as the top layer.
If you bake all the layers at once (like I did), you’ll have a bit of time on your hands. I used this time to get my buttercream together and clean up my workspace… you’ll be a lot happier if you do the same. 🙂
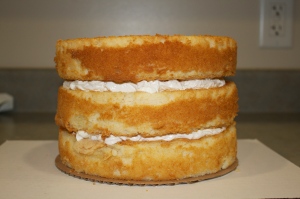
Once the layers have cooled, fill them with your choice of a filling. I used a Swiss Meringue Buttercream for stability, but you could use a ganache or cream filling if you wanted.
2. Carve your cake. It’s a bit intimidating trying to turn a traditional 3-layer cake into a baseball hat, but trust me, you can do it! A couple tips to get you started:
- Have a “model.” Lucky for me my boyfriend has the biggest hat collection on the planet. I swiped one of his to use as a reference point.
- Freeze the cake. I know, I know… freezing a cake is a cardinal sin in the world of baking and decorating. But honestly, if this is your first time carving a cake you’ll be GLAD you did! If you choose to freeze your cake, wrap it really good with saran wrap (to prevent it from drying out) and pop it in the freezer for 30 minutes – 1 hour. Freezing the cake just makes it easier to work with, and most people can’t taste the difference.
- Don’t crumb-ice before carving. I know this tip sounds really “duhhh,” but I honestly forgot and crumb-iced prior to carving and ended up cutting off ALL of the icing I had used. Save yourself time AND frosting, and don’t crumb-ice before. 🙂
Start with the top of the layers and carve down at an angle in order to give your cake a dome top. You’ll be cutting off most of the top layer, and the edges of the bottom two. Make sure to make your angled cuts very pronounced, because otherwise you won’t see them once you cover the cake in fondant.
For the baseball hat, make sure to make some “V”-shaped cuts in the top to account for rumples in the hat. Also, carve out a small hole in the back of cake to mimic an adjustable hat. This hole should be at the very bottom of the cake, and about 2″ wide by 1 1/2″ deep.
Again, make all the cuts extremelyyy pronounced. Your cake should end up being about 7 3/4 – 8″ wide (depending on how much you carve off of the sides), and about 4 – 4 1/2″ tall.
3. Crumb-ice the cake. After your carving work is done, cover the cake in a thin layer of buttercream. Crumb-icing, dirty icing, crumb coating… it doesn’t matter what you call it, but just make sure you do it. This coat of buttercream gives the fondant something to stick to, and also gives you the opportunity to smooth out any problems you might have run into during the carving process. Once your cake is crumb-iced, pop it in the fridge for 20-30 minutes to firm up.
In the meantime get started loosening up your fondant! You can use pre-tinted fondant, or color your own using gel food colors. You’ll need about a pound, maybe a bit more, to cover and decorate the cake. When tinting the fondant, be mindful of your hands. You can use plastic gloves, or coat your hands with a thin layer of shortening. The shortening won’t keep all of the color off of your hands, but it will help keep them mostly clean. Also, it is possible to ‘overwork’ the fondant and dry it out, so keeping shortening on your hands helps with that too.
4. Cover the cake. You can cover the cake in any medium you like – fondant, buttercream, marzipan, etc. I chose to use fondant for a couple of reasons: 1) it offers a beautifully smooth finish (when you apply it right), and 2) it seals the cake really well and helps to keep it fresh.
Roll out your fondant to about 1/4″ thick. You can make it a little thinner than that, but know that thin fondant is prone to tears, and tears are impossibly hard to fix!
Once you’ve reached the proper thickness roll 1/2 of the fondant back on your rolling pin, lift it up and gently place it over the cake.
Working quickly (but carefully!), lift and smooth out the fondant all around the cake. This, my friends, is a LOT harder than it sounds. Remove all of your rings, and be mindful of your nails as they can snag the fondant and cause unnecessary ruckus. Cut away excess fondant as necessary… the excess fondant will pull down and create wrinkles in the finished product.
Sorry that I don’t have any photos of this step. I was the only person at home & couldn’t cover a cake and photograph at the same time!! Gosh, Caty… 🙂
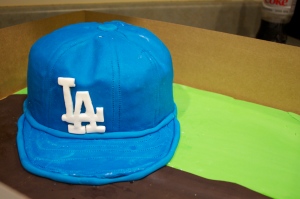
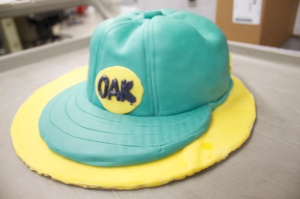
Here’s the final photos and you can see what I mean about working with fondant. I’ll admit, covering the green hat was MUCH easier than covering the blue hat, and I think it shows.
5. Decorate the hat! Keep your model on hand for this part, as there are a several details on the hat that you don’t want to overlook.
1. The bill. In order to make the bill of the hat I traced an outline on to cardboard and covered it in fondant. While the fondant was drying, I sort of curved the bill to give it some shape, and added stitching details. Be mindful of the proportions… the Oakland bill looks a bit off, but the Dodger bill looked much better.
2. The stitching. Wilton makes a nifty little roller tool that happens to have a piece that, when used, looks exactly like fabric stitches! Use this to create stitching on the bill, and to create the seams along the top of the hat.
3. The rivets & button. Look at the top of your model hat and note where the rivets are. Then using 2 different pastry tips make one outer ring and one inner ring. I believe I used a #4 for the outer ring, and a #2 for the inner ring. Also, roll a small ball out of fondant & flatten it slightly. Attach it to the center of the hat (on the top) with a light brushing of Vodka or lemon extract. Should look like this:
4. The Adjustable Strap. Remember that hole I made you cut out of the cake wayyyy back in step 2? Now it’s time to put it to work. Roll out a short piece of fondant that’s about 1/2″ wide, and make holes in it the same way you made the rivets. Cut one end of it in a curved shape, and attach it to the cake with… yes, you’ve guessed it… Vodka!
5. Logos. Often times colors are a dead giveaway, but the one thing all hats have in common is a logo! For the Oakland hat I simply cut out an oval-shaped piece of fondant and piped the acronym “OAK” on the front. The Dodger hat was a little different… I printed out a picture of the LA logo, cut it out, and placed it over my fondant. Then, using an Xacto Blade, I carefully cut the logo out of fondant and attached it to the front of my hat with a brushing of Vodka.
Note: I’m not that much of a lush. There are only 2 liquids that will allow you to attach 2 pieces of fondant together: Vodka and lemon extract. I happened to be out of lemon extract which is why I was using Vodka.
6. The Presentation. After you’ve put in all this work creating a fabulous cake you still have to consider one more thing… the presentation. I’m not the hugest fan of foil-covered cake boards, but you can use them if you like. You can also cover a board in fondant which is what I did for both cakes.
And there you have it! That’s the rundown on how to create a hat cake! I hope you’ve enjoyed the tutorial… feel free to leave questions or comments if you have any.


3 comments
Comments feed for this article
September 19, 2010 at 4:47 am
World Wide News Flash
How to Make a Hat Cake…
I found your entry interesting do I’ve added a Trackback to it on my weblog :)…
September 19, 2010 at 10:09 am
Tweets that mention How to Make a Hat Cake « zuccherino. -- Topsy.com
[…] This post was mentioned on Twitter by caty, caty. caty said: New blog post!! "How to Make a Hat Cake" – please enjoy & share if you like!! http://bit.ly/aOL0M7 #cake #baking […]
May 28, 2011 at 10:25 pm
Recent Work – May 2011 « zuccherino.
[…] all die hard Giants fans, so I couldn’t resist surprising them with a hat cake. Just like my earlier hat cakes, it was decorated in fondant with hand cut accents. Giants hat […]